By Dennis L Harvey
[This article first appeared in the May 2024 issue of Model Aviation Magazine]It is disheartening when you find your beautiful carbon fiber sailplane has some serious wing damage. It’s not uncommon after a mid-air collision at an F5J contest or after misjudging the distance to the tree line. Often, the damage seems so bad that you fear she isn’t repairable or if she is, she’ll gain a lot of weight. Fear not, because the technique in this article could solve both problems. I have used it on dozens of repairs for both my ships and the sailplanes of others.
Assessing the Damage
First step is assessing the damage. If there is spar damage, it should be repaired first to assure the wing is true. For now, let’s assume that the spar is intact. Let’s jump into an ugly damage situation, where there is a significant gouge in the wing.

Figure 1. Damage to the hollow wing of an older Vixen2. The damage goes back to the spar which is typical for hollow wings.
Figure 1 shows the damage to an older Vixen2 which is used as an example for this article. This is a hollow wing with a spar. This grafting technique also applies to foam core wings which will be mentioned at the end.
Figure 2 shows the gouge trued up to a rectangular hole. There will be more preparation of this opening but for now, I know how large a hole I am dealing with.

Figure 2. The gouge should be cut out and trued up. On the spar side of the cut, you can see the left side reveals the ragged joiner box exterior.
Making the Skin Graft
Because the damage has been trued to a rectangular hole, I know the size of the repair area. Let’s turn our attention to making the skin graft. We are going to mold a skin patch, top and bottom continuously, that will be spliced into the damaged area.
Choose an undamaged part of your wing set that is roughly the same chord as the damage area. You’re going to use this clean section of wing as a mold surface for making the graft. For this Vixen2, I used the other wing, near the wing root. I measured the damaged area and added 30 mm to the span-wise width of the graft.
Figure 3 shows the location of where I will mold the skin graft. First, I carefully cover the wing skin with packaging tape making sure there are no trapped air bubbles. Epoxy will not adhere to clear packaging tape so you will not need a release agent. The perimeter of my work area is protected with masking tape. Once I am finished making the graft, there will be no damage to the wing.

Figure 3. This is the area on an undamaged wing which will serve as the mold surface for molding the skin graft. The mold surface is protected with clear packaging tape.
A typical graft can be made using 5.7 oz/yd² carbon fiber cloth which is the most economical weave. I highly recommend the carbon fiber skin graft be made with the fiber bias oriented at 45 degrees. This allows the fibers to better form around the leading edge and the patch will be stronger. If your damaged wing is made with straight tow or spread tow for the surface, you could add a layer of this over the 5.7 oz carbon fiber for a cosmetically prettier finished repair. I also recommend that you add a layer or two of fine fiberglass (0.7 oz/yd²) over the carbon fiber to facilitate making a cosmetically pleasing finish. Most of this will be sanded away but leave glass and epoxy in the valleys of the carbon fiber weave.

Figure 4. The carbon fiber is draped over the work area and epoxy is applied. Saran Wrap covers the matrix so excess epoxy can be gently pushed to the perimeter.
The carbon fiber cloth is wetted out in place on the wing. I use West Systems 105 epoxy because of its excellent properties and long work time. After wetting, I cover the matrix with Saran Wrap so I can gently work out air bubbles and excess epoxy. In Figure 4, you can see that I use the handle end of a single edge razor blade and work the epoxy to the edges of the work area. I may go over the matrix a dozen gentle times making sure I don’t break the Saran Wrap in the process. Let this cure hard overnight.
Once the graft is cured, the Saran Wrap peels off easy as does the molded skin graft. The graft will have a thickness of about 0.3 mm.
Preparing the Hole for the Graft
The next step is to prepare the hole with flanges to receive the skin graft. Look carefully at Figure 5 and you can see that on the sides of the opening, there are flanges upon which the graft will be glued. These flanges are made with a 10 mm wide piece of the graft. To get this to fit precisely, you may have to trim away any foam core on the inside of the wing so the flange bonds skin to skin. These flanges are structural so you want to make sure the joints are robust.

Figure 5. This shows the skin graft is trimmed to fit perfectly. Read the text to understand how the flanges were added to the perimeter of the hole.
In this example, the joiner box and the wing spar shear web (made of balsa) served as a sturdy foundation to make an end-grain balsa flange running parallel to the spar. This flange was trimmed precisely to step down the thickness of the graft (remember 0.3 mm?). Last, the graft is trimmed to fit precisely in the hole. If you did everything carefully, you shouldn’t feel a step where the old wing meets the graft. If you feel the graft is a little to squishy for your liking, add balsa ribs on the inside. Now, bond into place.
If you’re repairing a foam core wing, I recommend cutting out the damaged core and not replacing it. When you are ready to put the side flanges into place, use an Exact-o blade to make a slit into which you can add epoxy to secure the flange. And finally, for those of you who like field fixes, you can always bond the graft directly over the damage.
Final Finishing of the Graft
Remember that I recommended that you add two layers of fine fiberglass cloth (0.7 oz/yd² or there abouts) over the carbon fiber. The purpose was to fill the valleys in between the carbon fiber weave. Now you should block sand this layer down to get a perfectly flat surface. You want to sand so that the sawdust is white. It will be gray if you start sanding the carbon fiber and you don’t want to compromise that structure. I use 220 grit to get the surface flat, then switch to 400 or higher. After all the sanding marks are gone, I smear a thin coat of epoxy over the surface to shine and set aside to hard cure.
The next step before bonding the graft into place is to trim it to the opening so it fits with a minimum of gap. Place the graft on the flanges and check for flushness. If it’s not perfect, you can either build up the flange surface with five-minute epoxy, or slightly file down the surface with a jeweler’s file. Once you’re happy, bond the graft in place making sure you clamp and tape it such that the flushness is maintained.

Figure 6. The finished repair. Although you can’t prove it in a photo, it is not possible to feel any step at the perimeter of the repair.
Another Example, This Time a Compound Curve
Let us look at another example of the skin graft technique applied to a compound curve like you’d encounter in a gouged wing tip. The example I will use here is a damaged Explorer wing tip. It is fortunate the owner painted the wing tip because the finished work can be painted to mask all underlying repair work. Also note that there is some skin separation in the blue area.
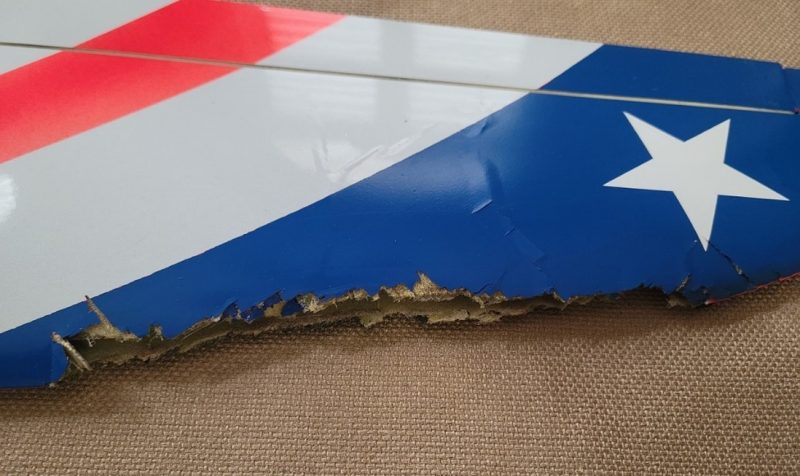
Figure 7. The gouged wing tip of an Explorer. The owner painted blue over the factory red which will make it easier to get a nice finish.
As with the Vixen2 repair, the next step after assessing the damage is to square up the damage area and create a rectangular hole. See Figure 8. Also notice in this figure than instead of choosing to use flanges for the repair, I decided to bevel the edges of the repair area so there will be about 2 mm of overlap between the damage edge and the graft.

Figure 8. The damage trued up to a rectangular hole and the edges beveled to match the bevel edge of the graft.
For this repair, the owner had an identical sister ship from which I could use a good left wing as a mold surface for the graft. If you don’t have a sister ship, one of your friends might. Remember, this molding process causes no damage to the intact ship.
Take a careful look at Figure 9. On this wing, instead of using packaging tape to protect the wing, I chose to stretch Saran Wrap around the wing surface. The wrap is held in place with masking tape which also forms a perimeter to the work area. To make this graft, I chose to use fine fiberglass cloth so it could form around the curves (especially the leading edge) and I would use multiple layers to achieve the desired stiffness. In this case, I used 8 layers of 0.7 oz/yd² to build up the equivalent of 5.6 oz/yd². I did not cover the matrix to work out air bubbles. Instead, I just used an acid brush and brushed out the excess epoxy and potential air bubbles. It worked fine.

Figure 9. The graft being molded on a fresh wing tip which is covered in stretched Saran Wrap and masked along the perimeter of the work area.

Figure 10. The Ugly. The skin graft is installed against matching beveled surfaces (damage wing edge to graft). The wing is ready for primer paint.
Figure 10 shows the graft installed. The graft was sized properly but with overlap and a bevel on the inner surface to match the bevel that was filed on the damaged wing. I did use a small amount of epoxy and micro-balloons (brown) to form a smooth surface. Additionally, the adjoining wing surface was repaired with cyano-acrylate glue and sanded with 400 grit sand paper. What you see in Figure 10, is the wing ready for primer paint. You can see that blue masking tape has already been installed on the white aileron wiper.

Figure 11. The Beautiful. Here the wing tip is painted and the Trim MonoKote star is installed.
Figure 11 shows the finished repair. Both the blue and one white stripe had to be painted. The all-up weight gain was about 7 grams.
So, with this second example, you can see that the skin grafting technique has some versatility. Next time you have a bad bang-up wing accident, maybe the salvage and repair won’t seem so impossible.